Querying FSIS with PowerShell
When building IMS search flows in FAST Search for Internet Sites (FSIS), I typically deploy them using the Add-Flow PowerShell cmdlet. One thing that always bugs me, is that there’s no easy way of testing the flows right away from the command-line. Usually, this isn’t a problem; you can always set up a new test site querying the flow, or just try to run it from your search application.
Still though, it would be cool to have a PowerShell script that runs a query through a flow, and displays the results. Turns out it’s not that hard to build! Though I have to admit it gets a little complex, and is not exactly FSIS standard procedure. But I found it interesting to put together and useful to have around – perhaps you will too.
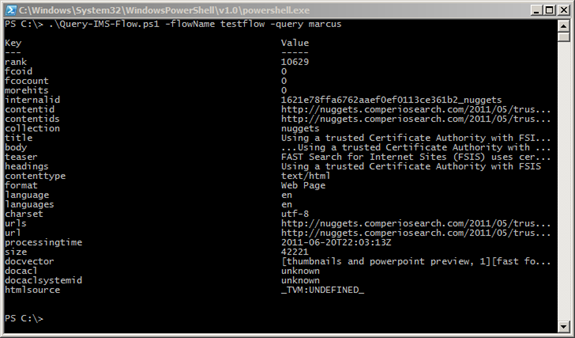
There’s a link to the source code at the end of this post, and I will discuss the most important parts of the script below. So let’s dive right in! The script takes two parameters: a flow name and a query that will target the ESP default composite field. In this experimental version of the script I haven’t polished the output, and actually only prints the first result document. Feel free to modify it to allow more advanced (arbitrary?) queries and stylish output – just make sure to report back when you’re done!
Here’s a screenshot of what the script produces today:
The IMS nodes expose two external interfaces that clients can use to send query requests: a WCF interface and a HTTP interface. At first look, the HTTP interface probably sounds like the easy way out. But it turns out the FSIS Shell is already prepared to run WCF queries.
How is that you wonder? When you run the built-in FSIS shell, you’ll notice that it preloads the shell with a bunch of important FSIS snap-ins. It also loads a special application configuration, more precisely %FSIS_HOME%\Powershell\Powershell.exe.config. This file defines two important WCF endpoints: NetTcpBinding_IProcessingEngineManager and NetTcpBinding_IProcessingEngine. It also defines which certificate to use in order to secure the communication. This is exactly what we need.
There’s one caveat with this approach: you’ll have to run the PowerShell console with your FSIS service user. This is because the certificate is fetched from its personal certificate store. Let me know if you find an elegant way around this.
How do we actually run the flow? Well, there is an Execute-Flow cmdlet. No, there are actually two. One from the snap-in EnginePSSnapIn for running flows in general, and one from InteractionEnginePSSnapIn that targets IMS flows. When you start the FSIS shell, they’re loaded in this order:
|
1 2 3 4 |
Add-PSSnapin HostControllerPSSnapIn Add-PSSnapin JunoPSSnapin Add-PSSnapin EnginePSSnapIn Add-PSSnapin InteractionEnginePSSnapIn |
Notice the problem? Yup, the one from InteractionEnginePSSnapIn will actually overwrite the one from EnginePSSnapIn. This is most likely a bug in the current FSIS release. But for the purpose of this blog post, it really doesn’t matter. We want the one from InteractionEnginePSSnapIn anyway.
Execute-Flow takes a Context as parameter. This context object is populated with a query and an IMS flow, and is then passed from task to task through the specified flow, until it comes out on the other end – hopefully with some search results attached to it.
Now is probably the time to say that this script won’t work for all types of flows. It depends on what type of tasks you put in your flow, and how you create the actual query that you’ll put on the context object. In this example, I’m using the simplest IMS flow possible: just a flow input, an ESP lookup, and the flow output:
So let’s create the context and make sure we target the IMS flow that was supplied when the script was called. The particular class we need is already loaded into the FSIS Shell environment, so it’s pretty easy:
|
1 2 |
$context = New-Object Microsoft.Ceres.InteractionEngine.Services.Context $context.EnsureRouting().FlowName = $flowName |
Building the query is harder. To do that, we have to go a little outside the scope of the FSIS shell. We have to use the same assembly that FSIS uses under the hood. Most users would probably never need to do this, but rather use IMS UI Toolkit to build queries and render results.
The DLL we’re interested in is called Microsoft.Ceres.InteractionEngine.ContextModifiers.dll. We load it into PowerShell with the one-liner below. Notice that $env:FSIS_HOME is PowerShell’s way of referencing an environment variable, in this case the installation directory of FSIS.
|
1 |
[Reflection.Assembly]::LoadFile($env:FSIS_HOME + "AdminUI\site\bin\Microsoft.Ceres.InteractionEngine.ContextModifiers.dll") |
After loading this assembly, we can reference classes in the ContextModifiers.Ims namespace. It contains lots of interesting classes for building advanced queries and parsing results. For now, we settle on using the ImsTermsOperator class, which translates into a standard text query. The ImsTermsOperator has several properties that control linguistics, if multiple terms within it should be ANDed or ORed, etc. For now, we just specify the “Terms” property to whatever is passed in when the script is called. Since we’re not specifying the $searchOp.Scope property, the query will target the default composite field.
|
1 2 |
$searchOp = New-Object Microsoft.Ceres.InteractionEngine.ContextModifiers.Ims.ImsTermsOperator $searchOp.Terms = $query |
Next step is to add the $searchOp to the context, and for that we need to use a wrapper class called ImsSearch. Take a look in the source code below for the gory details about this. For now, let’s just skip right to the grand finale: we connect to IMS using Connect-ProcessingEngine, and run the flow with the Execute-Flow cmdlet; passing in the context object and getting back an updated version bundled with the search results:
|
1 2 |
Connect-ProcessingEngine $imsHost $imsPort $context = Execute-Flow $context |
As the $context variable is serialized during transfer back and forth to IMS, we also need to explicitly parse out the search results, and cast it into an object of type Ims.ImsSearchResults. It looks a little messy, but is actually very straight-forward.
Take a look in the code for yourself: Query-IMS-Flow.ps1.
All of this could of course also be written in your favorite .NET language. Then you could also get around the certificate issue quite easily. I guess I’m just a PowerShell fanboy. ![]()


