SharePoint search display templates made easy
One of the most interesting features in SharePoint 2013 are the display templates. This blog post will describe how to customize a search display template in order to show the item created date.
The display templates are located in the site collection root site, under the _catalogs/Display Templates folder. Each template has two files: the html file and a javascript file. The javascript file is the one that SharePoint uses, while the html exists in order to make it easier for us developers to create and customize the display templates. Once an html file has been modified, SharePoint generates the corresponding updated javascript file, so the process is fully automated.
So what are the steps involved in creating a new display template?
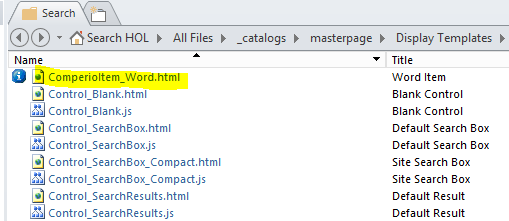
In SharePoint designer, after opening the root website, navigate to the Display Templates folder. Here, in the Search subfolder, you will find the display templates that SharePoint uses for many types of results – documents, web sites, people and others. Choose a display template as a starting point for your own, depending on the result type that you are targeting, copy it and then rename it. Once saved, you will see that SharePoint has already generated the corresponding javascript file. Modify the html file as you wish. What is left to do now is to link the template to an actual result type, so that SharePoint knows what to associate your display template to. This can be done through the interface, by navigating to Site Settings – Search Result Types.
Let’s take it step by step.
Duplicating an existing display template
Open the site collection with SharePoint designer. Navigate to the Display Templates folder under _catalogs\masterpage\display templates. Here you will find some Folders that SharePoint uses to group Display Templates together.
The Word item template is in the Search folder. Make a copy of the Item_Word.html and rename it to ComperioItem_Word.html

Edit the file and inside you will see some html and javascript code.
Edit the title field so that your custom template has a different display name than the original one.
The <mso:CustomDocumentProperties> tag contains some properties of the template. Some important properties are:
- TargetControlType – tells SharePoint what the template is used for (search results, web parts, filters)
- ManagedPropertyMapping – contains a list of the managed properties that are or can be used by the current template
The <body> tag contains the rendering logic for the display template.
The template can only recognize the managed properties that are listed in the header. To use another managed property, add it here. We are using the Created property that displays the document created date.
|
1 2 3 |
<mso:ManagedPropertyMapping msdt:dt="string"> 'Title':'Title','Path':'Path', [………..] , ‘Created’:’Created’ </mso:ManagedPropertyMapping> |
Now that the template is aware of the property, you can use it by adding it to the body. Add the line below in the Body of the rendering template:
|
1 |
<div class="ms-descriptiontext"> _#= ctx.CurrentItem.Created =#_ </div> |

Mapping the display template to a result type
Now we are going to manually link the display template to a result type, so that we can see that it works.
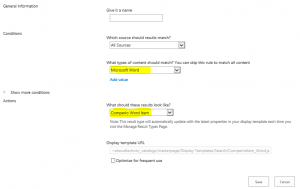
In order for SharePoint to use your custom template, it needs to know of it. So navigate to Site Actions – Site Settings and under Site Collection Administration choose Search Result Types. Create a New Result Type for your template like below:
- Choose a Name
- Choose Microsoft Word as content to match
- Choose your custom display template
Now go to the results page and search for a word document. The results should display a date looking like this:
We have only been scratching the surface and a lot more customization can be done here, for example formatting the date value in javascript by using a function like format(“yyyy-MM-dd”) on a Date object. Combined, SharePoint and javascript have (almost) endless possibilities.
Happy coding!


