Elasticsearch: Shield protected Kibana with Active Directory
Elasticsearch easily stores terabytes of data, but how can you make sure users only see the data they should? This post will explore how to use Shield, a plugin for Elasticsearch, to authenticate users with Active Directory.
Elasticsearch will by default allow anyone access to all data. The Shield plugin allows locking down Elasticsearch using authentication from the internal esusers realm, Active Directory (AD) or LDAP . Using AD, you can map groups defined in your Windows domain to roles in Elasticsearch. For instance, you can allow people in the Fishery department access only to fish-indexes, and give complete control to anyone in the IT department.
To use Shield in production, you have to buy an Elasticsearch subscription, however, you get a 30-day trial when installing the license manager. So let’s hurry up and see how this works out in Kibana.
In this post, we will install Shield and connect to Active Directory (AD) for authentication. After having made sure we can authenticate with AD, we will add SSL encryption everywhere possible. We will add authentication for the Kibana server using the built in authentication realm esusers, and if time allows at the end, we will create two user groups, each with access to its own index, and check how it all looks when accessed in Kibana 4.
Prerequisites
You will need a previously installed Elasticsearch and Kibana. The most recent versions should work, I have used Elasticsearch 1.7 and Kibana 4.1.1 If you need a machine to test on, I can personally recommend the vagrant-elk-box you can find here: The following guide assumes the file locations of the vagrant-elk-box, if you install differently, you will probably know where to look. Ask an adult for help.
For Active Directory, you need to be on a domain that uses Active Directory. That would probably mean some kind of Windows work environment.
Installing Shield
If you’re on the vagrant box you should begin the lesson by entering the vagrant box using the commands
|
1 2 |
vagrant up vagrant ssh |
Install the license manager
|
1 |
sudo /usr/share/elasticsearch/bin/plugin -i elasticsearch/license/latest |
Install Shield
|
1 |
sudo /usr/share/elasticsearch/bin/plugin -i elasticsearch/shield/latest |
Restart elasticsearch. (service elasticsearch restart)
Check out the logs, you should find some information regarding when your Shield license will expire (logfile location: /var/log/elasticsearch/vagrant-es.log)
Integrating Active Directory
The next step involves figuring out a thing or two about your Active Directory configuration. First of all you need to know the address. Now you need to be on your windows machine, open cmd.exe and type
|
1 |
set LOGONSERVER |
The name of your AD should pop back. Add a section similar to the following into the elasticsearch.yml file (at /etc/elasticsearch/elasticsearch.yml)
|
1 2 3 4 5 6 |
shield.authc.realms: active_directory: type: active_directory domain_name: superdomain.com unmapped_groups_as_roles: true url: ldap://ad.superdomain.com |
Type in the address to your AD in the url: field (where it says url: ldap://ad.superdomain.com). If your logonserver is ad.cnn.com, you should type in url: ldap://ad.cnn.com
Also, you need to figure out your domain name and type it in correctly.
NB: Be careful with the indenting! Elasticsesarch cares a lot about correct indenting, and may even refuse to start without telling you why if you make a mistake.
Finding the Correct name for the Active Directory group
Next step involves figuring out the name for the Group you wish to grant access to. You may have called your group “Fishermen”, but that is probably not exactly what it’s called in AD.
Microsoft has a very simple and nice tool called Active Directory Explorer . Open the tool and enter the adress you just found from the LOGONSERVER (remember? it’s only 10 lines above)
You may have to click and explore a little to find the groups you want. Once you find it, you need the value for the “distinguishedName” attribute. You can double click on it and copy out from the “Object”.
This is an example from my AD
|
1 |
CN=Rolle IT,OU=Groups,OU=Oslo,OU=Comperiosearch,DC=comperiosearch,DC=com |
Now this value represents a group which we want to map to a role in elasticsearch.
Open the file /etc/elasticsearch/shield/role-mapping.yml. It should look similar to this
|
1 2 3 4 5 6 7 8 9 10 11 12 |
# Role mapping configuration file which has elasticsearch roles as keys # that map to one or more user or group distinguished names #roleA: this is an elasticsearch role # - groupA-DN this is a group distinguished name # - groupB-DN # - user1-DN this is the full user distinguished name power_user: - "CN=Rolle IT,OU=Groups,OU=Oslo,OU=Comperiosearch,DC=comperiosearch,DC=com" #user: # - "cn=admins,dc=example,dc=com" # - "cn=John Doe,cn=other users,dc=example,dc=com" |
I have uncommented the line with “power_user:” and added a line below containing the distinguishedName from above.
By restarting elasticsearch, anyone in the “Rolle IT” group should now be able to log in (and nobody else (yet)).
To test it out, open http://localhost:9200 in your browser. You should be presented with a login box where you can type in your username/password. In case of failure, check out the elasticsearch logs (at /var/log/elasticsearch/vagrant-es.log).
If you were able to log in, that means Active Directory authentication works. Congratulations! You deserve a refreshment. Some strong coffee, will go down well with the next sections, where we add encrypted communications everywhere we can.
SSL - Elasticsearch
Authentication and encrypted communication go hand in hand. Without SSL, username and password is transferred in plaintext on the wire. For this demo we will use self-signed certificates. Keytool comes with Java, and is used to handle certificates for Elasticsearch. The following command will generate a self-signed certficate and put it in a JKS file named self-signed.jks. (swap out $password with your preferred password)
|
1 |
keytool -genkey -keyalg RSA -alias selfsigned -keystore self-signed.jks -keypass $password -storepass $password -validity 360 -keysize 2048 -dname "CN=localhost, OU=orgUnit, O=org, L=city, S=state, C=NO" |
Copy the certificate into /etc/elasticsearch/
Modify /etc/elasticsearch/elasticsearch.yml by adding the following lines:
|
1 2 3 4 5 |
shield.ssl.keystore.path: /etc/elasticsearch/self-signed.jks shield.ssl.keystore.password: $password shield.ssl.hostname_verification: false shield.transport.ssl: true shield.http.ssl: true |
(use the same password as you used when creating the self-signed certificate )
Restart Elasticsearch again, and watch the logs for failures.
Try to open https://localhost:9200 in your browser (NB: httpS not http)
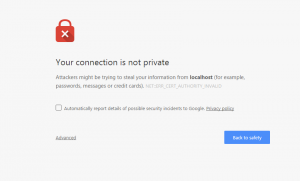
https://localhost:9200
You should a screen warning you that something is wrong with the connection. This is a good sign! It means your certificate is actually working! For production use you could use your own CA or buy a proper certificate, which both will avoid the ugly warning screen.
SSL – Active directory
Our current method of connecting to Active Directory is unencrypted – we need to enable SSL for the AD connections.
1. Fetch the certificate from your Active Directory server (replace ldap.example.com with the LOGONSERVER from above)
|
1 |
echo | openssl s_client -connect ldap.example.com:6362>/dev/null| openssl x509 > ldap.crt |
2. Import the certificate into your keystore (located at /etc/elasticsearch/)
|
1 |
keytool -import-keystore self-signed.jks -file ldap.crt |
3. Modify AD url in elasticsearch.yml
change the line
|
1 |
url: ldap://ad.superdomain.com |
to
|
1 |
url: ldaps://ad.superdomain.com |
Restart elasticsearch and check logs for failures
Kibana authentication with esusers
With Elasticsearch locked down by Shield, it means no services can search or post data either. Including Kibana and Logstash.
Active Directory is great, but I’m not sure I want to use it for letting the Kibana server talk to Elasticsearch. We can use the Shield built in user management system, esusers. Elasticsearch comes with a set of predefined roles, including roles for Logstash, Kibana4 server and Kibana4 user. (/etc/elasticsearch/shield/role-mapping.yml on the vagrant-elk box if you’re still on that one).
Add a new kibana4_server user, granting it the role kibana4_server, using this command:
|
1 2 |
cd /usr/share/elasticsearch/bin/shield ./esusers useradd kibana4_server -p secret -r kibana4_server |
Adding esusers realm
The esusers realm is the default one, and does not need to be configured if that’s the only realm you use. Now since we added the Active Directory realm we must add another section to the elasticsearch.yml file from above.
It should end up looking like this
|
1 2 3 4 5 6 7 8 9 10 |
shield.authc.realms: esusers: type: esusers order: 0 active_directory: order: 1 type: active_directory domain_name: superdomain.com unmapped_groups_as_roles: true url: ldap://ad.superdomain.com |
The order parameter defines in what order elasticsearch should try the various authentication mechanisms.
Allowing Kibana to access Elasticsearch
Kibana must be informed of the new user we just created. You will find the kibana configuration file at /opt/kibana/config/kibana.yml.
Add in the username and password you just created. You also need to change the address for elasticsearch to using https
|
1 2 3 4 5 6 7 8 9 |
# The Elasticsearch instance to use for all your queries. elasticsearch_url: "https://localhost:9200" # If your Elasticsearch is protected with basic auth, this is the user credentials # used by the Kibana server to perform maintence on the kibana_index at statup. Your Kibana # users will still need to authenticate with Elasticsearch (which is proxied thorugh # the Kibana server) kibana_elasticsearch_username: kibana4_server kibana_elasticsearch_password: secret |
Restart kibana and elasticsearch, and watch the logs for any errors. Try opening Kibana at http://localhost:5601, type in your login and password. Provided you’re in the group you gave access earlier, you should be able to login.
Creating SSL for Kibana
Once you have enabled authorization for Elasticsearch, you really need to set SSL certificates for Kibana as well. This is also configured in kibana.yml
|
1 2 3 4 |
verify_ssl: false # SSL for outgoing requests from the Kibana Server (PEM formatted) ssl_key_file: "kibana_ssl_key_file" ssl_cert_file: "kibana_ssl_cert_file" |
You can create a self-signed key and cert file for kibana using the following command:
|
1 |
openssl req -x509 -newkey rsa:2048 -keyout key.pem -out cert.pem -days 365 -nodes |

Configuring AD groups for Kibana access
Unfortunately, this part of the post is going to be very sketchy, as we are desperately running out of time. This blog is much too long already.
Elasticsearch already comes with a list of predefined roles, among which you can find the kibana4 role. The kibana4 role allows read/write access to the .kibana index, in addition to search and read access to all indexes. We want to limit access to just one index for each AD group. The fishery group shall only access the fishery index, and the finance group shall only acess the finance index. We can create roles that limit access to one index by copying the kibana4 role, giving it an appropriate name and changing the index:’*’ section to map to only the preferred index.
The final step involves mapping the Elasticsearch role into an AD role. This is done in the role_mapping.yml file, as mentioned above.
Only joking of course, that wasn’t the last step. The last step is restarting Elasticsearch, and checking the logs for failures as you try to log in.
Securing Elasticsearch
Shield brings enterprise authentication to Elasticsearch. You can easily manage access to various parts of Elasticsearch management and data by using Active Directory groups.
This has been a short dive into the possibilities, make sure to contact Comperio if you should need help in creating a solution with Elasticsearch and Shield.


Great article. There’s a tiny issue with one of your code boxes, SSL – Active directory section 2. It’s showing HTML tags with the commands.
Thanks anonyomus. I take this as proof that at least one person actually read it.